A sliding patio door is one of the highest-impact upgrades in a Texas home renovation — more natural light, smoother indoor-outdoor flow, and better energy performance when it's installed correctly. The catch is that "installed correctly" carries real weight here. A large glass door system that's even slightly out of level will jam, leak air, and fail years ahead of schedule.
This guide covers the full installation process, the right product for your opening, and the mistakes that create expensive callbacks — whether you're a contractor running a new build or a homeowner managing a replacement project.
Why Installation Quality Matters More Than the Door Itself
Texas homes face conditions that expose bad installation work fast — extreme heat, humidity swings, high wind pressure on backyard-facing openings, and dust infiltration through any gap that shouldn't be there. A quality door unit with a poor installation will underperform every time.
What's actually at stake:
- Energy costs — air leakage around a poorly sealed frame adds directly to HVAC load in Texas summers
- Sliding performance — even a 1–2mm level variance causes track binding within months
- Water infiltration — incorrect drainage slope outside the threshold lets water pool at the base
- Long-term frame integrity — thermal expansion in Texas heat amplifies minor installation errors over time
Get the installation right and a quality sliding door system lasts 20–30 years with minimal maintenance.
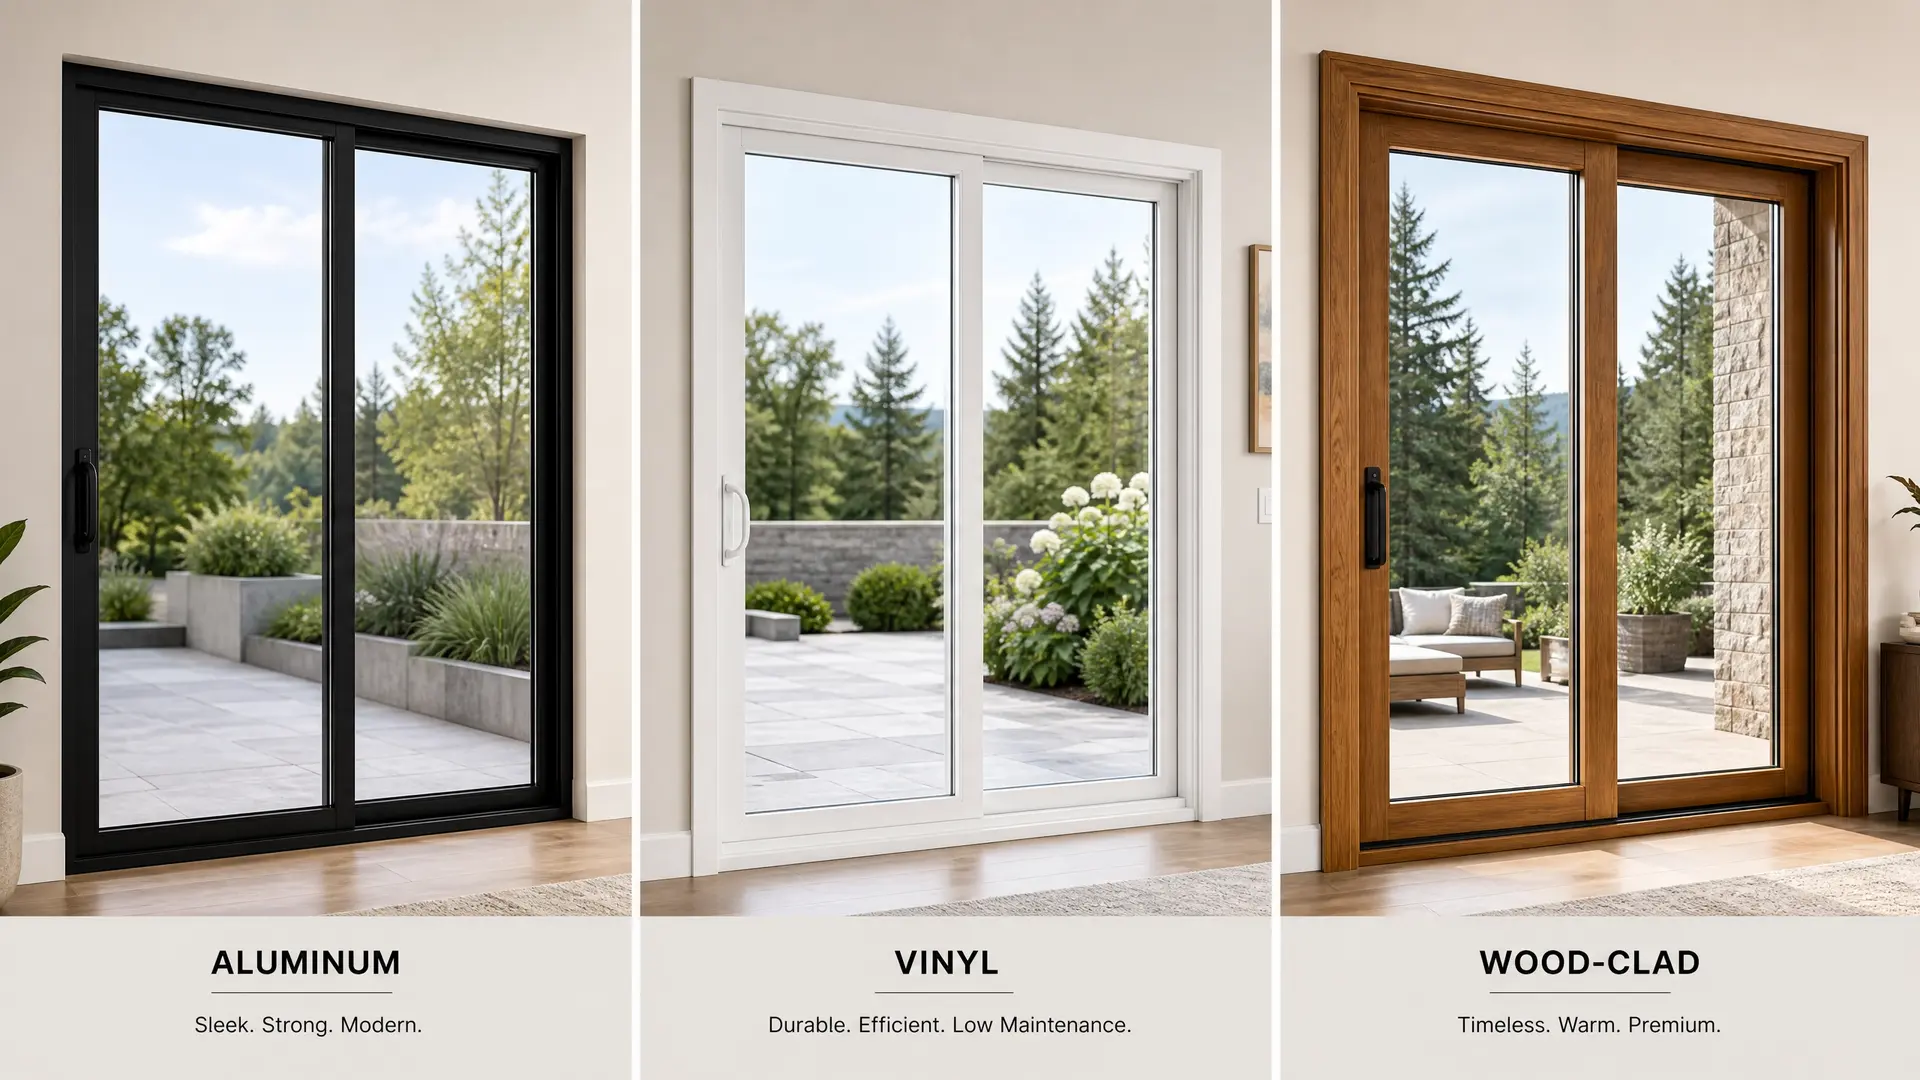
Choosing the Right Sliding Patio Door for Your Opening
Highline Building Supplies carries three primary sliding patio door configurations used across Texas residential and contractor projects:
Elevate 12068 Sliding Patio Door — 144×80 (ELE12068PDSLBLK)
The standard residential workhorse. At 144" wide and 80" tall, this configuration fits most conventional patio openings without requiring structural modification to the rough opening. Strong airflow control, clean sightlines, and straightforward installation make it the default spec for production builds and renovation replacements.
Best for: Standard residential builds, townhouses, renovation replacements, budget-conscious projects where structural modification isn't viable.
🔗 [Shop ELE12068PDSLBLK at Highline Building Supplies]
Andersen Wood-Clad 12080 Sliding Patio Door — 144×96 (ELE12080PDSL)
The large-format option for open-plan living areas and modern backyards. The extra 16" of height changes how the door reads in the space — floor-to-near-ceiling glass creates a genuinely different indoor-outdoor connection than a standard-height door. Requires precise framing and leveling due to increased panel weight.
Best for: Open-plan homes, modern architecture, rooms with 9'+ ceiling heights, spaces where the door is a design focal point.
🔗 [Shop ANDERSEN WINDOWS at Highline Building Supplies]
Ply-gem Aluminum 12080 Sliding Patio Door BLK — 144×96 (ELE12080PDSLBLK)
Same large-format configuration as above in a matte black frame finish. The black aluminum profile has become the dominant aesthetic choice in contemporary Texas residential — it reads as architectural rather than just functional, and pairs cleanly with modern exterior cladding, dark window frames, and minimalist landscaping.
Best for: Contemporary and transitional homes, dark exterior schemes, luxury builds where frame color is part of the design brief.
🔗 [Shop PLYGEM WINDOWS at Highline Building Supplies]
Pre-Installation Checklist
Don't start until every item on this list is confirmed. This is where most installation problems originate — not during the install itself.
| Check | What to Verify |
| Rough opening dimensions | Width, height, and depth match the selected door unit |
| Level and plumb | Wall structure is square — check both vertical and horizontal |
| Subfloor flatness | No high spots or low spots within the threshold zone |
| Moisture barrier | Existing barrier is intact and compatible with new frame |
| Drainage slope | Exterior grade slopes away from the threshold — minimum 1/8" per foot |
| Fastener compatibility | Corrosion-resistant fasteners specified for Texas humidity |
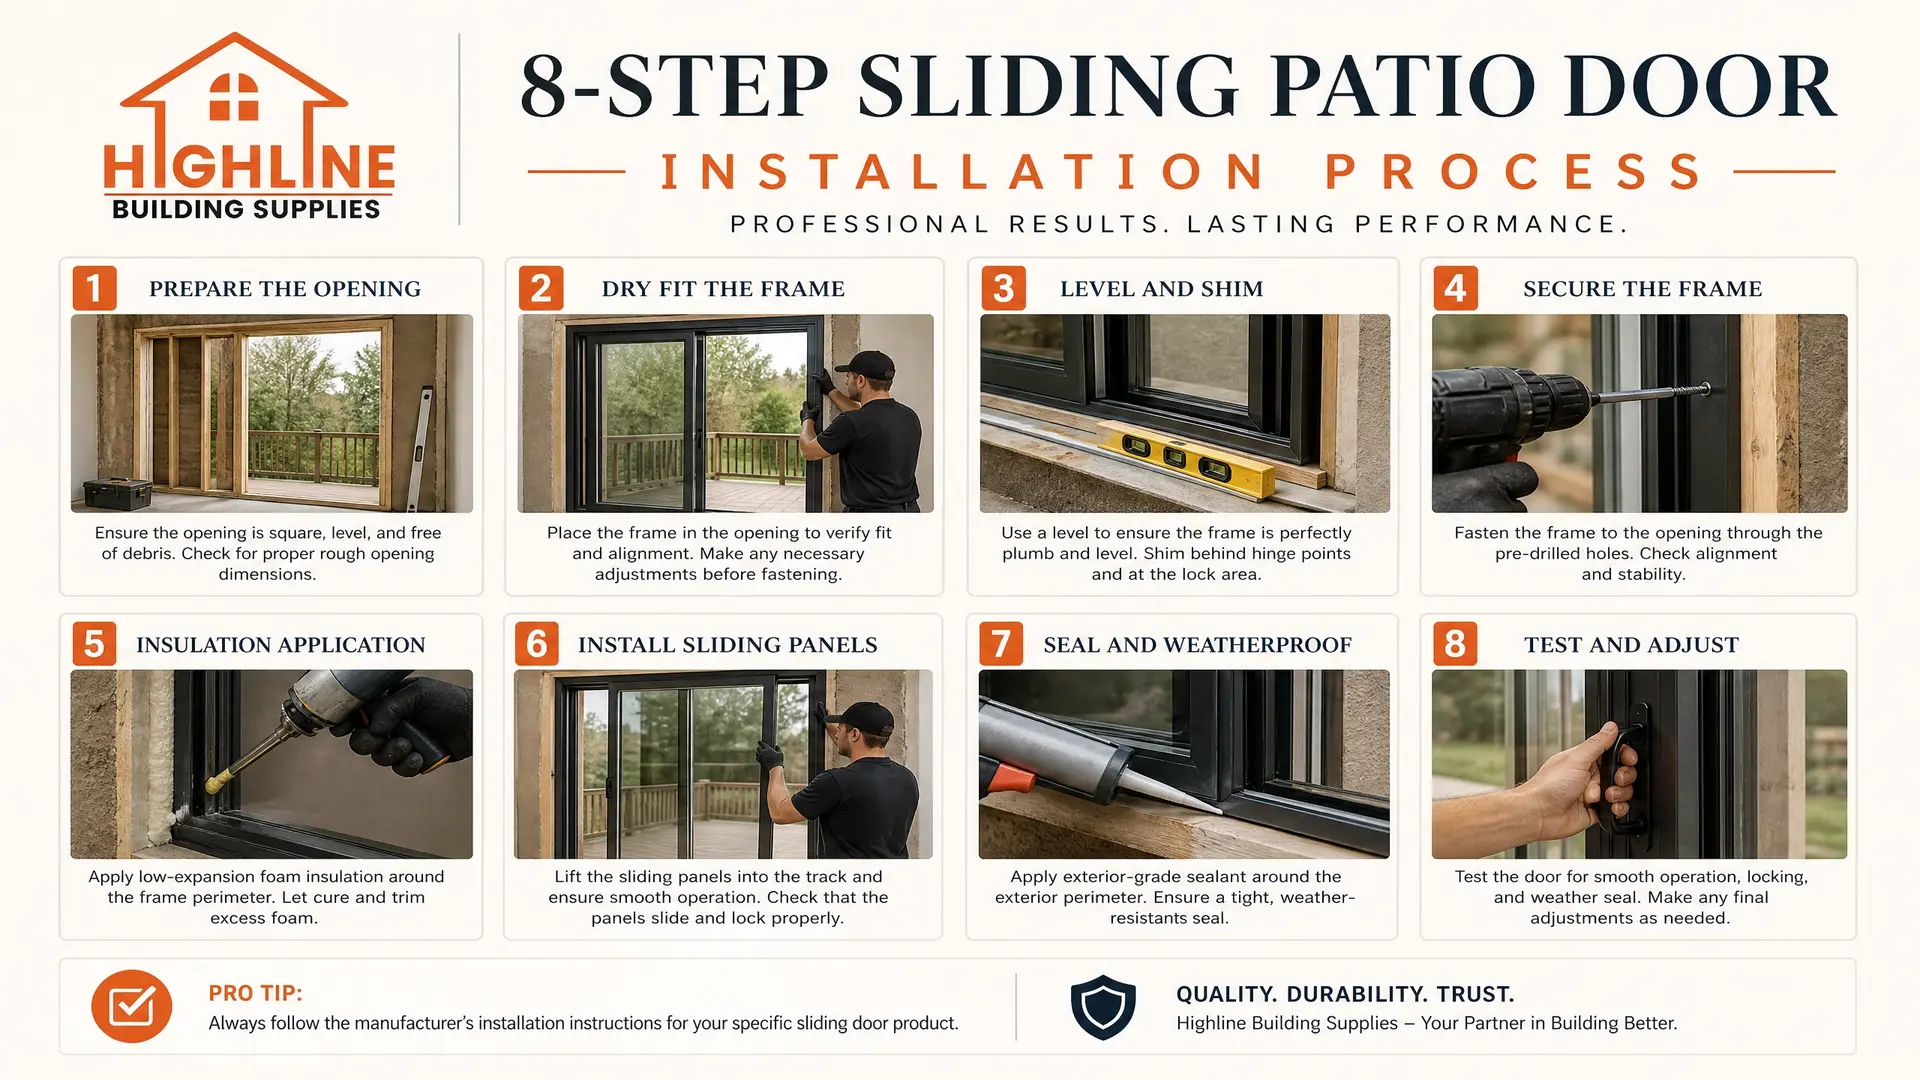
Step-by-Step Installation Process
Step 1 — Prepare the Opening
Remove existing door if replacement project. Clear debris, old fasteners, and any deteriorated sealant or flashing. Inspect framing for rot, moisture damage, or structural movement before proceeding.
Step 2 — Dry Fit the Frame
Place the unit into the opening without fastening. Confirm clearance on all sides, check that the sill sits flush with the subfloor, and identify any shimming requirements before committing to final position.
Step 3 — Level and Shim
This is the most critical step. Shim the base first, then the sides. Use a 4-foot level across the sill and both jambs. Even 1–2mm of variance will affect sliding performance — especially on the large-format 144×96 units where panel weight amplifies any misalignment.
Step 4 — Secure the Frame
Fasten through the frame into wall studs using corrosion-resistant screws. Do not overtighten — this can bow the frame and affect panel travel. Check level again after each fastener is set.
Step 5 — Insulation Application
Apply low-expansion foam between the frame and wall cavity. Standard expanding foam exerts too much pressure on the frame and causes misalignment — use low-expansion specifically. This step controls air leakage and thermal performance.
Step 6 — Install Sliding Panels
Insert the fixed panel first, then the sliding panel onto the track. Adjust roller height to ensure the panel sits square in the frame and travels smoothly across the full track length without resistance.
Step 7 — Seal and Weatherproof
Apply exterior-grade silicone at all frame-to-wall junctions. Confirm the sill pan flashing is directing water away from the opening. In Texas, dust and wind-driven rain test sealant joints harder than most other climates — don't rush this step.
Step 8 — Test and Adjust
Test the full slide range, locking mechanism engagement, and check for air movement around the perimeter with a hand or smoke pen. Adjust rollers if any resistance is felt. Confirm the lock engages cleanly without forcing.
Professional Installation vs. DIY
For the 12068 configuration, an experienced DIYer with the right tools can manage the installation. For the 12080 144×96 units — both configurations — professional installation is the practical recommendation. The panel weight, precision leveling requirements, and structural load considerations are outside the range of most DIY projects.
What professional installation protects:
- Manufacturer warranty (most require professional installation for warranty validity)
- Structural load handling on large-format units
- Liability on contractor-managed builds
Maintenance After Installation
Keep the system performing for its full 20–30 year lifespan:
- Track cleaning — every 2–3 months, clear dust and debris from the lower track
- Roller lubrication — twice a year with a silicone-based lubricant (not WD-40)
- Sealant inspection — annually, check for cracking or separation at all exterior joints
- Drainage channel check — after storms, confirm the sill drainage is clear and flowing
FAQs
Q: How long does sliding patio door installation take?
Most residential installations run 3–6 hours for a standard 12068 unit. Large-format 12080 144×96 systems typically take 5–8 hours when done correctly, including shimming, sealing, and final adjustments.
Q: Can a sliding patio door be installed in an older Texas home?
Yes — but the rough opening often needs resizing or structural reinforcement first. Older framing may not be square or plumb to modern tolerances, which requires correction before the new unit goes in.
Q: Why is my sliding patio door hard to open after installation?
Almost always a leveling issue — the frame is either not perfectly level or the rollers weren't adjusted after panel installation. In Texas heat, thermal expansion can also tighten a panel that was borderline at install.
Q: Are sliding patio doors energy efficient in Texas?
When properly installed with insulated double-pane glass and correct sealing — yes, significantly. The glass unit itself matters, but the installation quality determines how much of that performance is actually delivered in the home.
Q: What's the difference between the 12068 and 12080 configurations?
Primarily height — the 12080 is 96" tall vs. the 12068's 80". The extra height changes the visual impact significantly and is better suited to 9'+ ceiling heights. The 12080 also requires more precise installation due to increased panel weight.
Ready to Source Your Sliding Patio Door?
The difference between a sliding patio door that performs for 25 years and one that needs service calls in year three comes down to two things: the right product for the opening, and the installation done correctly the first time.
Highline Building Supplies stocks the full Elevate sliding patio door range — standard and large-format configurations, black and standard frame finishes — for homeowners, contractors, and builders across Texas and the USA.
🔗 Shop Sliding Patio Doors → highlinesupplies.com/shop/category/windows-51